
Frequently Asked Questions#
Tip
See our Navigating CURC Documentation page for information on core areas of our documentation each user should become familiar with.
How do I acknowledge use of CURC Resources?#
Show
On our Acknowledging CURC Resources page, we provide material on how to acknowledge CURC resources.
Duo Multi-Factor Authentication#
How do I setup Duo?#
Show
CU Boulder users can follow these steps:
Download the Duo mobile app to your phone (available via Apple App Store or Google Play Store).
Once installed, visit https://duo.colorado.edu to enroll.
CSU users please see CSU’s documentation on Duo 2-factor authentication
CSU users can manage their account at https://it.colostate.edu/duo-two-factor-authentication/
AMC or RMACC users please see Duo’s documentation on 2-factor authentication
AMC and RMACC users can manage their account at https://cilogon.org/?selected_idp=httsp%3A%2F%2Faccess-ci.org%2Fidp&skin=access
As a CU Boulder user, how can I login with Duo?#
Show
Duo offers a variety of methods to log into your account. Depending on what you select when setting up your Duo account, you should have several different methods of 2-factor authentication when logging into RC Resources.
Duo Mobile Push is Research Computing’s recommended method of 2-factor authentication. Because Duo Push is tied to your physical smart device instead of a phone number or account, Duo Push provides a more secure method of 2-factor authentication than either SMS or phone call.
Type:
ssh <username>@login.rc.colorado.eduinto the command line. For example, if my username is jodo2018 I would typessh jodo2018@login.rc.colorado.edu.Enter your identikey password when prompted.
Wait for a push to your phone.
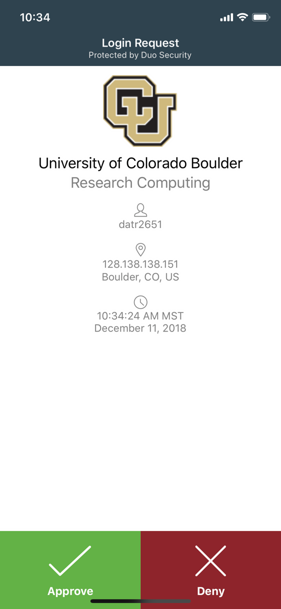
Note
Duo push is tied to your device so you will need to add or remove your device if you get a new phone.
There is also an option to generate a temporary passcode from within the Duo app. This passcode can be used to log into https://duo.colorado.edu.
If you prefer to not use the Duo app or if you don’t have a smart device, then Duo offers an SMS method of 2-factor authentication:
Type:
ssh <username>@login.rc.colorado.eduinto the command line. For example, if my username is jodo2018 I would typessh jodo2018@login.rc.colorado.edu.Enter your password when prompted, as
mypassword,sms. For example, if my password is Ih3artdu0 I would type:Ih3artdu0,sms.A list of one-time-passwords (OTPs) will be texted to you via SMS. Another login prompt will appear on your screen. Using the first OTP in the list, login with your password as
mypassword,OTP. For example, if my password is Ih3artdu0 and my OTP is 330456 I would type (without quotes):Ih3artdu0,330456.Note that the next time you login, you can either request a new list of OTPs using Step 2 and then enter the first OTP via Step 3, or you can just use the next OTP in the list, and skip directly to Step 3.
Duo also provides a phone call solution for 2-factor authorization if you only have a land line, or prefer to not use Push or SMS:
Type:
ssh username@login.rc.colorado.eduinto the command line. For example, if my username is jodo2018 I would typessh jodo2018@login.rc.colorado.edu.Enter your password when prompted, as
mypassword,phone. For example, if my password is Ih3artdu0 I would type:Ih3artdu0,phone.Wait for a phone call. Answer the call, select option #1, and you will automatically be logged in.
This documentation is for customers who have registered a Yubikey with CU Boulder.
Type:
ssh username@login.rc.colorado.eduinto the command line. For example, if my username is jodo2018 I would typessh jodo2018@login.rc.colorado.edu.Enter your password when prompted, as
mypassword,6-digit-number. The 6-digit number is given to you on the Duo token. For example, if my password is Ih3artdu0, and I press the button on the token and it is 123456, I would type:Ih3artdu0,123456.
I have a new phone. As a CU Boulder user, how do I move my Duo onto it?#
Show
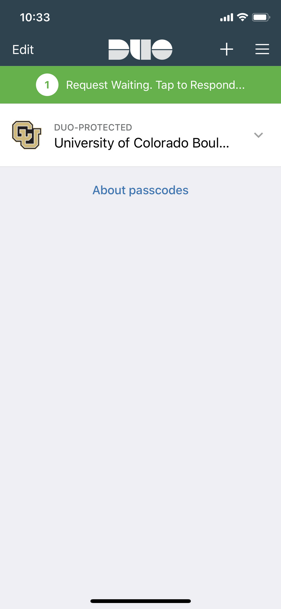
You can add a new device to your duo account by visiting https://duo.colorado.edu. After a CU authorization page you will be directed to a Duo authentication page. Ignore the Duo Push prompt and instead click “Add a new device”:
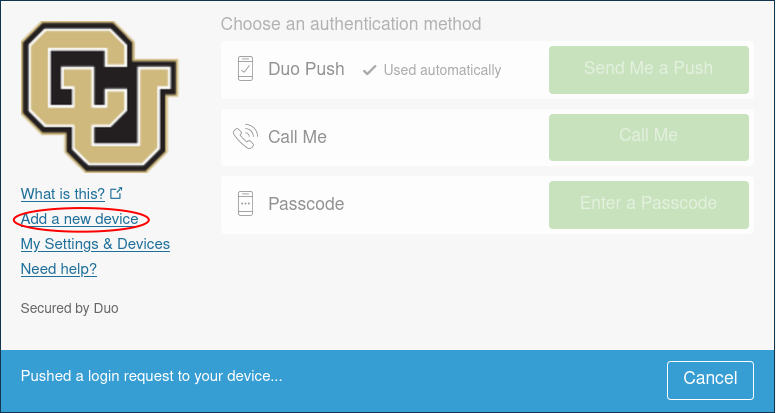
Duo will then try to authenticate your account by push notification to verify your identity. Cancel this push notification…
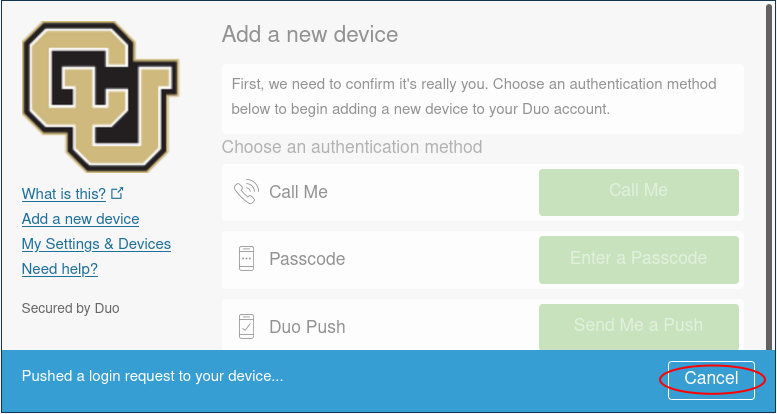
…and click on “Enter a Passcode”, or “Call Me”.
If you select “Call Me” the simply receive the call and press 1.
If you select “Enter a Passcode” then click “Text me new codes” and you will be sent a list of one time passwords. Type in any one of the codes and you will be authenticated.
Once you have verified your identity, follow the instructions provided by Duo to add your device.
If you cannot authenticate your account (e.g. do not have your old device), we suggest reviewing the Duo FAQ page or contacting oithelp@colorado.edu.
As a CU Boulder user, how can I manage my Duo devices?#
Show
Users can manage their own Duo devices by visiting https://duo.colorado.edu. This enables users to add or remove activated devices at their discretion.
After a CU authorization page, you will be directed to a Duo authentication page. Do not respond to the Push notification and instead click the “Settings” button:
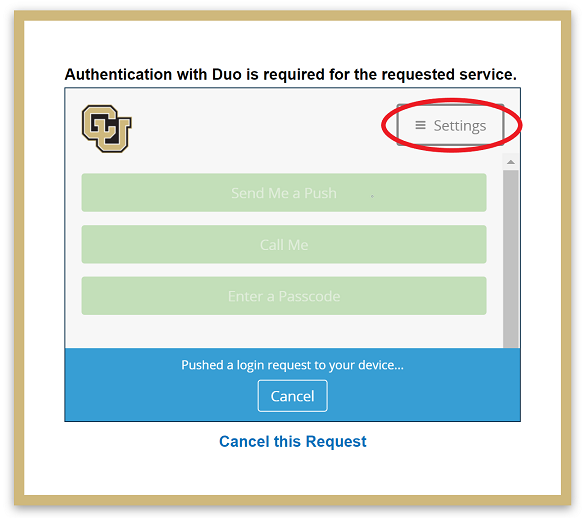
This will bring up a menu that provides several options on device management and general help.
Clicking “Add a new device” will allow you to add a new smart phone, tablet, or land-line. Simply select the option you wish to add and follow the steps provided by Duo to complete setting up your new device.
Selecting “My Settings & Devices” provides a more detailed list of all devices you have registered. From here you can also add a new device, set your default device, and change your default authentication method when you attempt to log in.
None of the FAQs for Duo resolved my issue, how do I proceed as a CU Boulder user?#
Show
If none of the above resolved the issues you were experiencing, then your Duo account may have expired. The university purges Duo accounts after six months of non-use. You can re-enroll by visiting https://duo.colorado.edu. If that did not resolve your issue, then we suggest contacting the University helpdesk at oithelp@colorado.edu or calling 303-735-4357.
Microsoft Multi-Factor Authentication#
CU Boulder web portal services use Microsoft MFA. You will use the same Microsoft MFA method you already have configured for campus services such as Outlook and Teams (for example, the Microsoft Authenticator app, text message, or a security key).
Which CURC services use Microsoft MFA?#
Show
CU Boulder users authenticate with Microsoft MFA when signing in to the following web-based services:
Globus (when signing in with University of Colorado at Boulder credentials)
If you need to enroll in or manage Microsoft MFA, visit OIT’s Microsoft 365 Multi-Factor Authentication documentation. If you have trouble signing in, the IT Service Center can help. Support is also available through Buff Techs and Buff Techs Pro. You will be required to have your Buff OneCard or government ID for MFA help.
General High-Performance Computing#
What is Arbiter2?#
Show
Arbiter2 is a tool created by the University of Utah that enables monitoring of non-compute node resources for undesirable behavior. For an in-depth explanation of how Arbiter2 works, please see the official paper “Arbiter: Dynamically Limiting Resource Consumption on Login Nodes”. In the context of Arbiter2, “undesirable behavior” refers to processes that consume substantial CPU or memory (RAM) resources on low resource hosts, such as CURC’s login nodes. If Arbiter2 flags a user’s process(es) as undesirable behavior, the user’s account will be placed into a penalty state. Once in a penalty state, the amount of CPU and memory resources available to the user on the host will be reduced and the user will be sent a no-reply warning email. Examples of processes that can consume substantial resources include installing/compiling/running software applications and manipulating large files (e.g. compressing, uncompressing, and/or moving files). For a list of all hosts that Arbiter2 is deployed on, see the Host column in the table below.
Important
A user’s penalty state will be the same across all of the login nodes. This means that if your account is placed in a penalty state on one login node, it will be in the same penalty state on the other login nodes.
Where and how Arbiter2 is deployed may change over time. This is due to adjustments we may need to make so that Arbiter2 fits the needs of the system and users. Please refer to this FAQ for the most up-to-date information.
Once a user’s processes consume more than the allotted amount of CPU resources, their processes will be automatically throttled.
If a user’s processes use more memory than they are allotted, the processes will be automatically killed.
Attention
Please note that the maximum values listed are intended to support intermittent spikes in demand for resources, not sustained usage. These hosts are a shared resource, so please be considerate of others and use the compute nodes whenever possible.
| Host | Penalty State | Maximum User Resource Allocation |
Duration of Penalty |
|---|---|---|---|
| login nodes | normal | 4 CPU cores 4 GB of RAM |
N/A |
| penalty1 | 3.2 CPU cores 3.2 GB of RAM |
30 minutes | |
| penalty2 | 2 CPU cores 2 GB of RAM |
1 hour | |
| penalty3 | 1.2 CPU cores 1.2 GB of RAM |
2 hours |
How can I reset my .bashrc?#
Show
Every Research Computing account has a .bashrc file in their /home directory. This file ensures your account’s environment is properly configured whenever you login or run a job on a compute node. We do not recommend editing this file, unless you know what you are doing. If you accidentally delete or edit the file, you can restore your .bashrc by taking the following steps:
Navigate to your home directory :
cd ~Open or create the .bashrc :
vim .bashrcornano .bashrcCopy + paste the following code snippet into your .bashrc and then save the file, replacing any existing text in the file (if any).
# .bashrc

if [ -f /etc/bashrc ]; then
. /etc/bashrc
fi
How can I add users to a Linux group?#
Show
Before requesting users be added to a Linux group, please fully read the Workspace Sharing section, which provides an alternative approach for workspace sharing. If you would like to proceed with adding someone to a Linux group, please submit a support request form using the following:
Select
StorageforNature of requestSelect
I would like to add a collaborator to my directoryforIssue typeFill out the requested additional information
Provide any justification or additional details in
Detailed description
When will my job start?#
Show
You can pull up information on your job’s start time using the squeue command:
squeue --user=your_rc-username --start
Note that Slurm’s estimated start time can be a bit inaccurate. This is because Slurm calculates this estimation off the jobs that are currently running or queued in the system. Any job that is added in later with a higher priority may delay your job.
For more information on the squeue command, take a look at our Useful Slurm Commands tutorial. Or visit the Slurm page on squeue
Note that you can also see system level wait times and how they change through time by visiting the CURC metrics portal at https://xdmod.rc.colorado.edu
How can I get metrics about CURC systems such as how busy they are, wait times, and account usage?#
Show
Please refer to our XDMoD documentation, which is a portal that allows users to easily see CURC system metrics.
How much memory did my job use?#
Show
You can check how much memory your job utilized by using the sacct command and refering to the MaxRSS metric. This is done as follows where you can replace YYYY-MM-DD with the date you ran the job and specify your JobID:
sacct --starttime=YYYY-MM-DD --jobs=your_job_id --format=User,JobName,JobId,MaxRSS
If you’d like to monitor memory usage on jobs that are currently running, use the sstat command:
sstat --jobs=your_job_id --format=User,JobName,JobId,MaxRSS
For more information on sstat or sacct commands, take a look at our Useful Slurm Commands tutorial. Or visit the Slurm reference pages on sstat and sacct.
You can also view information related to service unit (SU) usage and CPU & RAM efficiency using slurm commands. Note that CPU & RAM efficiency statistics will be included in emails sent when a job completes, if requested.
Why am I getting unexpected results for my GPU memory or utilization metrics?#
Show
Currently, GPU metrics are collected by Slurm. Due to system limitations, there are some scenarios where GPU metric collection is not possible. Thus, the output of sacct or seff may not match your expectation or what is provided by nvidia-smi or amd-smi. Below we provide important considerations when reviewing GPU metrics collected by Slurm.
GPU metrics are available for most NVIDIA GPUs across Alpine and Blanca. At this time, GPU memory and utilization metrics are not available on the following GPU types: AMD, GH200s, P100s, and A40s.
GPU metrics can only be collected if your code utilizes CUDA 12 or newer.
GPU metrics are partially available on MIG-enabled NVIDIA GPUs. You can get GPU memory usage values, but GPU utilization metrics are not reported for individual MIG partitions.
Core cluster GPUs (e.g., core-gpu[0-4], viz1, viz2), which power Core Desktop and MATLAB GUI, do not currently support GPU memory or utilization metrics.
Users running jobs on unsupported GPUs or older CUDA versions will see zeros or N/A or infinite values for GPU memory and utilization fields. Make sure your jobs are running on compatible hardware to obtain meaningful GPU metrics.
Why is my job pending with reason ReqNodeNotAvail?#
Show
The ReqNodeNotAvail message usually means that your node has been reserved for maintenance during the period you have requested within your job script. This message often occurs in the days leading up to our regularly scheduled maintenance, which is performed the first Wednesday of every month. So, for example, if you run a job with a 72 hour wall clock request on the first Monday of the month, you will receive the ReqNodeNotAvail error because the node is reserved for maintenance within that 72-hour window. You can confirm whether the requested node has a reservation by typing scontrol show reservation to list all active reservations.
If you receive this message, the following solutions are available:
Run a shorter job or modify your current job’s time so that it does not intersect with the maintenance window. One can modify your current job’s time by using the
scontrolcommand:$ scontrol update jobid=<jobid> time=<time>
Wait until after maintenance window has finished. Once maintenance has completed, your job will resume automatically.
How can I check what accounts (allocations) I belong to?#
Show
You can check the allocations you belong to with the sacctmgr command. This can be done by typing the following from a login or compute node:
sacctmgr -p show associations user=$USER
This will print out an assortment of information including allocations and QoS available to you. For more information on sacctmgr, please refer to Slurm’s documentation.
Why do I get an LMOD error when I try to load Slurm?#
Show
The slurm/alpine and slurm/blanca module environments cannot be loaded from compute nodes. It should only be loaded from login nodes when attempting to switch between Blanca and Alpine environments. This error can be disregarded, as no harm is done.
Software#
How can I submit a software installation request?#
Show
Before submitting a software installation request, please review our Software installation policies. To proceed with a software installation request, you should submit a support request form. Within this form you should make the following selections:
Select
SoftwareforNature of requestSelect the cluster you would like to run this software on for
ClusterSelect
Software installation requestforIssue typeComplete all fields requested in the form
Submit the form
How do I install Python libraries?#
Show
For individuals who need to install Python libraries not included in our base Python or Anaconda modules, we recommend using Conda environments through the Anaconda module. Instructions for creating a custom Conda environment can be found on our Python and R with Anaconda documentation page.
Alpine#
Why do I get an Invalid Partition error when running an Alpine job?#
Show
This error usually means users do not have an allocation that would provide the service units (SUs) required to run a job. This can occur if a user has no valid allocation, specifies an invalid allocation, or specifies an invalid partition. Think of SUs as “HPC currency”: you need an allocation of SUs to use the system. Allocations are free. New CU users should automatically get added to a ucb-general allocation upon account creation which will provide a modest allocation of SUs for running small jobs and testing/benchmarking codes. However, if this allocation expires and you do not have a new one you will see this error. ucb-general allocations are intended for benchmarking and testing and it is expected that users will move to a project allocation. To request a Project and apply for a Project Allocation visit our allocation documentation.
Blanca#
Why do I get an Invalid Partition error when running a Blanca job?#
Show
If you are getting an Invalid Partition error on a Blanca job which you know you have access to or have had access to before, you may have the slurm/alpine module loaded. From a login node, run module load slurm/blanca to access the Slurm job scheduler instance for Blanca, then try to resubmit your job.
Can you tell us more about the Service Level Agreement (SLA) this hardware comes with?#
Show
Current guidelines for Blanca hardware support can be found in the Blanca Memorandum of Understanding
Do you offer a percent uptime guarantee for the duration of the SLA?#
Show
Individual nodes do not receive an uptime estimate due to wide variation in issues that may occur.
Are backup and restore options available?#
Show
We do not offer backups as part of the Blanca service. Users wishing to use and store their own files with an option for backup are encouraged to purchase space on the RC maintained PetaLibrary. The local storage on each node (SSDs) are reserved for temporary data storage during jobs (data on SSDs is deleted at the end of each job); therefore, backup is not offered for SSDs.
Can you clarify how priority works?#
Show
Blanca node owners (and their designated group members) are guaranteed priority on nodes they purchase. Each Blanca owner has their own high-priority QoS (blanca-<group identifier>) for jobs that will run on their nodes. High-priority jobs can run for up to 7 days. All partners also have access to a low-priority QoS (preemptable) that can run on any Blanca nodes that are not already in use by the partners who contributed them. Low-priority jobs will have a maximum time limit of 24 hours and can be preempted at any time by high-priority jobs that request the same compute resources being used by the low-priority job. Additional factors for determining job priority include the job’s age and the number of jobs recently run by the user/account.
Can a priority tier system be implemented?#
Show
Often, users want to share resources with another faculty member potentially buying the same kind of node, this is defined as a priority tier system. In other words, two groups have priority on each other’s resources when the other group is not using them and before other users on Blanca. Unfortunately, Blanca does not typically support tiers of priority, except to distinguish preemptable jobs from jobs submitted by node owners. However, a node owner may authorize another user or set of users to have equivalent priority access to their nodes, if they wish.
General Storage#
How do I check how full my directories are?#
Show
You have three directories allocated to your username ($USER). These include /home/$USER (2 G), /projects/$USER (250 G) and /scratch/alpine/$USER (10 T). To see how much space you’ve used in each, from a login node, type curc-quota as follows:
[janedoe@login11 ~]$ curc-quota
------------------------------------------------------------------------
									Used         Avail    Quota Limit
------------------------------------------------------------------------
/home/janedoe                          1.7G          339M           2.0G
/projects/janedoe                       67G          184G           250G
/scratch/alpine1                      1050G         8950G         10000G
You can also check the amount of space being used by any directory with the du -sh --apparent-size command or the directory’s contents with the du -h command:
[janedoe@c3cpu-a7-u26-3 ~]$ du -h /scratch/alpine/janedoe/WRF
698M	WRF/run
698M	WRF
How can I request an increase in my scratch storage space?#
Show
Before requesting an increase to your scratch storage space, please review our policies for Alpine scratch quota increases. Once you have reviewed the policies, you can submit a support request form using the following:
Select
StorageforNature of requestSelect
I would like to request an increase to my scratch spaceforIssue typeIn the
Detailed descriptionbox, provide a brief (approximately one paragraph) justification describing why a workflow requires the requested increase.
PetaLibrary#
Why does my PetaLibrary allocation report less storage than I requested?#
Show
Every ZFS-based PetaLibrary allocation has snapshots enabled by default. ZFS snapshots are read-only representations of a ZFS filesystem at the time the snapshot is taken. For more information on ZFS Snapshots, please refer to our ZFS Snapshots documentation.
PetaLibrary allocation sizes are set with quotas, and ZFS snapshot use does count against your quota. Removing a file from your filesystem will only return free space to your filesystem if no snapshots reference the file. Filesystem free space does not increase until a file on a filesystem and all snapshots referencing said file are removed. Because snapshots can cause confusion about how space is utilized within an allocation, the default snapshot schedule discards snapshots that are more than one week old.
If you would like to set a custom snapshot schedule for your allocation, please submit a support request form. Note that the longer you retain snapshots, the longer it will take to free up space by deleting files from your allocation.
Are there any alternatives to using PetaLibrary for data backups?#
Show
Offsite backup options are available from cloud-based storage providers.
Access details:
CU Boulder affiliates all have 5 TB of space in Microsoft OneDrive. You can use Globus or rclone to copy data between PetaLibrary and OneDrive.
Pros:
Free up to 5 TB using OneDrive
Copy of data is off-campus
Cons:
Limits on file sizes
OneDrive can be sensitive to unconventional file names and long paths
Access details:
You can use
Rcloneto copy your data to AWS for a monthly fee. Submit a support request form for options to establish access to AWS.
Pros:
No data volume limit
AWS data integrity assurance is very high
Copy of data is off-campus
Cons:
You incur additional costs
I am a BioKEM facility user, how do I have my data deposited to my PetaLibrary Allocation?#
Show
If you are a BioKEM facility user, you can choose to have your data deposited directly into your PetaLibrary allocations. This process involves creating a biokem-deposit directory in your allocation’s root directory and setting permissions to a biokem specific owner and group. Visit our documentation on the BioKEM facility to learn about the process.
Open OnDemand#
Why is my Jupyter session throwing a QOSMaxSubmitJobPerUserLimit error?#
Show
Some of our Open OnDemand applications allocate resources, which can be limited to one session. All Open OnDemand applications that submit jobs to Alpine’s ahub partition have this limitation. Currently, all applications utilizing the presets configurations will be submitted to the ahub partition. This partition provides users with rapid start times, but limits users to one Jupyter session (or any one job using the partition). In order to spawn another Jupyter session, you first need to close the current job. You can do so by shutting down your current Jupyter session or by canceling your job manually.